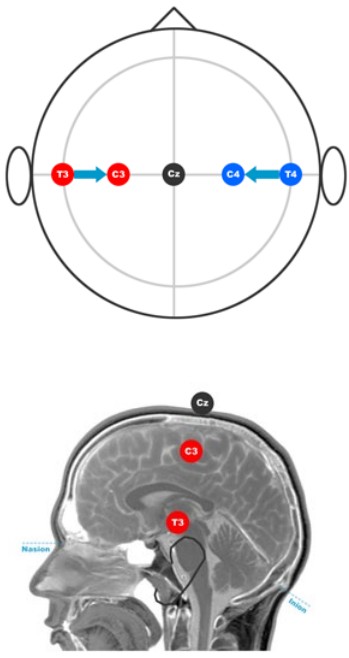
tDCS所使用的刺激点是采用EEG 10-20 脑电图定位系统
1.Introduction
General Introduction
The 10/20 system or International 10/20 system is an internationally recognized method to describe the location of scalp electrodes.
The system is based on the relationship between the location of an electrode and the underlying area of cerebral cortex. The numbers ‘10’ and ‘20’ refer to the fact that the distances between adjacent electrodes are either 10% or 20% of the total front-back or right-left distance of the skull.
Each site has a letter to identify the lobe and a number to identify the hemisphere location.
No central lobe exists, the ‘C’ letter is used for identification purposes only.
The ‘z’ (zero) refers to an electrode placed on the mid line.
Even numbers (2,4,6,8) refer to electrode positions on the right hemisphere.
Odd numbers (1,3,5,7) refer to electrode positions on the left hemisphere.
Four anatomical landmarks are used for the essential positioning of the electrodes: first, the nasion which is the point between the forehead and the nose;
second, the inion which is the lowest point of the skull from the back of the head and is normally indicated by a prominent bump;the pre auricular points anterior to the ear.
Extra positions can be added by utilizing the spaces in between the existing 10/20 system.
The next pages are a step by step guide for measuring positions of the 10/20 system.
10 / 20 System Electrode Distances
2.Electrode Placement Procedure
Step 1
Take a measuring tape and use the centimeter side.
Measure over the center line of the scalp, from the Nasion (bridge of the nose) to the Inion (occipital pretu-berance). Note the total length.
For our example, the total length is 36 cm.
Finding the Inion: if you run your finger up the back of the neck, you will encounter a depression with the ridge of the protruding inion just above it
Step 2
Measure and mark 50% of your total.
This is your preliminary Cz mark.
In our example 36 cm / 2 = 18 cm
Step 3
Measure and mark 10% up from the Nasion and 10% up from the Inion.
These are your preliminary mark of Fpz and Oz.
In our example 10% of 36 cm is 3.6 cm
Step 4
Mark 20% from either the first mark of Fpz or Cz.
These will be your preliminary marks of Fz and Pz.
In our example 20% of 36 cm is 7.2 cm
Step 5
Measure from preauricular point to preauricular-point. Lightly run your finger up and down just anterior to the ear; the indentation above the zygo-matic notch is easily identified. Opening the mouth slightly makes it easier to find the exact location.
Note the total length.
For our example it is 38 cm
Step 6
Measure and mark 50% of your total.
At the intersection with your previous 50% mark from the Nasion to the Inion is your true Cz mark.
In our example 38 cm / 2 = 19 cm
Step 7
Measure and mark 10% up from the pre auricular points. These are your preliminary marks of T3 and T4.
In our example 10% of 38 cm is 3.8 cm
Step 8
Measure from your first mark of T3 to Cz.Note the total length.
Measure from your first mark of T4 to Cz.Note the total length.
For our example 15 cm
Step 9
Measure and mark 50% of the totals in the previous step. These are your preliminary marks of C3 and C4.
In our example 15 cm / 2 = 7.5 cm
Step 10
Draw a cross section mark on Fpz.
This is your true Fpz mark.
Step 11
Encircle the measuring tape accross your 10% Fpz mark and the 10% Oz mark at the back of the head.Note the total circumference of the head.
Measure 50% of the total circumference from Fpz to the back of the head. At the cross section with your preliminary Oz mark is your true Oz mark.
For our example 56 cm / 2 = 28 cm
Step 12
Measure and mark 5% of total circumference to the left and right of Oz. These will be your true marks of O1 and O2.
In our example 5% of 56 cm = 2.8 cm
Step 13
Measure and mark 5% of total circumference to the left and right of Fpz. These will be your true Fp1 and Fp2 marks.
In our example 5% of 56 cm = 2.8 cm
Step 14
Measure and mark 10% down from Fp1 and Fp2.
These are your marks for F7 and F8.
In our example 10% of 56 cm = 5.6 cm
Step 15
Measure from F7 to F8 and note your distance.
For our example 32 cm
Positioning for T5 and T6 is analogous to step 14 for determining F7 and F8
Step 16
Measure and mark half of the distance between F7 and F8. At the intersection with your preliminary Fz mark is the true mark for Fz.
In our example 32 cm / 2 = 16 cm
Step 17
Measure from F7 to Fz, note the distance.
Measure from F8 to Fz, note the distance.
For our example 16 cm and 16 cm
Positioning for Pz is analogous to steps 15 and 16 for determining Fz
Step 18
Measure and mark half of the distance between F7-Fz and F8-Fz. These are your preliminary marks for F3 and F4.
In our example 16 cm / 2 = 8 cm
Positioning for P3 and P4 is analogous to steps 17, 18 and 19 for determining F3 and F4
Step 19
Measure and mark 20% of the Nasion-Inion distance from FP1 to F3. At the intersection will be your true F3 mark.
Measure and mark 20% of the Nasion-Inion distance from FP2 to F4. At the intersection will be your true F4 mark.
In our example 20% of 36 cm = 7 cm
Step 20
Measure from Fp1 to O1, to obtain your preliminary mark of C3.
Measure from Fp2 to O2 to obtain your preliminary mark of C3.
For our example 28 cm
Step 21
Measure and mark half of the distance Fp1-O1.Where your first and second marks intersect will be your true C3.
Measure and mark half of the distance Fp2-O2.Where your first and second marks intersect will be your true C4.
In our example 28 cm / 2 = 14 cm
10 / 20 System Positions